
 Hey, loves! I finally got back to my DIY loving lifestyle recently. I was at the Walmart, buying 54654623 things I didn't need and I came across this $5 contact paper. I had seen people using it on counter tops and I wanted to do it because, let's face it, actual marble counter tops are insanely pricey and we're for sure not ready to go gutting our kitchen anytime soon. My dingy fake wood, laminate counter tops had started to make me twitch a little because they had stains, burn marks, scratches, etc on them and I wanted a fresh new look. I decided to just try it out and I'm SO glad I did. I have lots of tips for you so if you're thinking about doing this fun project, read this first!...

It was a dark day so I apologize for the photo quality! I will update the photos soon but have a friend wanting to know the tips. Wanted to get this up asap!
They look so pretty! I'm super impressed and it was only $10 total to do. I have a fairly small kitchen and I had to use two rolls. I do have the little back splash behind mine so if you don't have that, you may be able to get away with one roll. I also wasted 3 pieces on the first spot I started because I couldn't get the creases out! But finally, I figured out the trick to it and after that, it went so smoothly. Once I got that out of the way, it really only took me a little over an hour IF that.
Here's what you'll need for these super easy DIY counter tops:
// Caulk and a caulking gun
// Cleaner and a rag/paper towels
// Contact paper of choice
// A razor/ exacto knife
// A larger straight edge
// Scissors
(I used one of my sons books)
And here's HOW to achieve this look!
First I started by taking off all of the caulk around the sink, and off of the seams with a razor blade. After that I wiped the counters off very well with vinegar and some paper towels making sure to get all of the little pieces of caulk that came off.
Next I laid down my first piece. Here's where it gets a little tricky. The first part is always tricky but if you're wanting the contact paper to go all around your counters, meaning on the sides and front edge, then you need to measure starting at the bottom of your side edge of your counter (leaving a little excess so you don't run short) then roll it out going from the top of your counters to the bottom edge. Cut on the lines on the back with scissors making sure to go a small bit longer (we will trim this part off later) Start at the top of your piece of contact paper pealing off the backing. DON'T peal it all off at once. Fold the backing back and line up your contact paper with your backsplash. Lightly press on the top part to your counter just to make sure it sticks. DON'T smooth it out with your hands. This is how I got so many creases the first couple times. Take your straight edge and just go back and fourth smoothing it down coming towards you making sure your're slowly pulling the backing evenly off as you go. On the first section at the edge, fold your paper down over the edge after its all smooth on top. You don't need to push too hard. The harder you push, the more likely you'll stretch it out and get creases.

Go all the way down your counters. Use your razor to cut around your sink. This doesn't have to be perfect because you will be adding caulk around it later on so that will cover up any jagged edges.
The next somewhat tricky part is going to be any corners you may have. The easy way to do it would be to just lay the contact paper going the same way all around. I have an L shaped kitchen and I could have done that but the pattern would be going in two different directions as you turn to look at both sides of the kitchen if I did that and I want them to look as real as possible. My counters already have a seam going from corner to corner so I stuck down the first piece and cut using the seam as a guide for my knife. Go very slow here as you could lose your seam and mess it up.


After I cut the seam, I pulled the other side off. In order to do the other side of the seam, you will lay down the contact paper with the backing STILL on. If you stick down the contact paper over the contact paper on the right side of the seam that's already down, it will pull up when you go to take it off and stretch out the other side and you will have creases galore. I didn't get a picture of this part but I just laid down the contact paper how I wanted it on the left side with the backing still on, keeping the pattern going up and down from back splash to edge just like we did on the other side. I got the length I wanted and weighted it down with a few things I had handy to keep it in place as I cut the seam down. After it was cut, I stuck it down.

Now as you see, the pattern does what It's supposed to do!
Like I said before, I have a small back splash that goes up a few inches. I just measured the paper, cut it, and stuck it down folding the edges over like a present, as shown below... I cut the corner so the edges would fold over on top of each other. This is also how you will do the edges folding down over your counter tops.

Next you will go around and trim all of the edges under your counters. Make sure your knife is very sharp and just run it along the edge under your counters to make a straight edge. If your counters underneath are smooth, you could skip this step and just fold it under but mine are made of particle board so this doesn't stick well to it.
Last thing to do is caulk! Just run the caulk around the seams where your counters meet the back splash and make sure you do it around your sink so that no water gets underneath and lifts up the contact paper. This pattern is so busy, if you have issues, you could always patch instead of taking off whole pieces. I am super impressed with the quality and how they have held up. Sure it's only been a few days of them being on, but I really love how it turned out. Super cheap and makes a huge difference! I'll show a couple before and afters below..


Here's some befores...

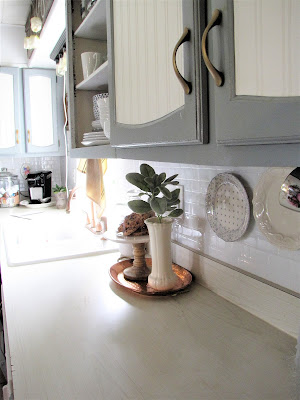
and afters...


And as always, a guest appearance by lil red ;P

I really hope you enjoyed and got some inspiration for your own home and I REALLY hope this tutorial made sense! If you have questions, feel free to leave them below and I'd love to help you out! I love easy DIY's that make a big impact, especially when they're cheap! I appreciate you all and thank you so much for stopping by to see what I'm up to over here. Have a wonderful rest of your week!!
xx

Let's be friends!!
FACEBOOK | INSTAGRAM | PINTEREST